Honda wipers step by step inspection: your 2026 guide
TL;DR:
- Regular Honda wiper inspection includes checking the blades, arms, linkage, and motor to ensure safe visibility. Engaging the maintenance position before lifting wiper arms prevents damage to newer models and simplifies inspection. Routine cleaning, timely replacement, and proper calibration extend wiper lifespan and performance.
A Honda wipers step by step inspection is the systematic process of assessing your wiper blades, arms, linkage, and motor to maintain clear visibility and safe driving. Worn or damaged wipers are a genuine safety risk on Australian roads, where sudden downpours, UV exposure, and extreme heat accelerate rubber deterioration faster than in milder climates. Newer Honda models include a dedicated maintenance position feature that raises the wiper arms safely without risking paint or linkage damage. This guide walks you through every stage of the wiper blade inspection process, from preparation through to calibration, so you can keep your Honda performing reliably all year round.
What tools and preparations do you need before inspecting Honda wipers?
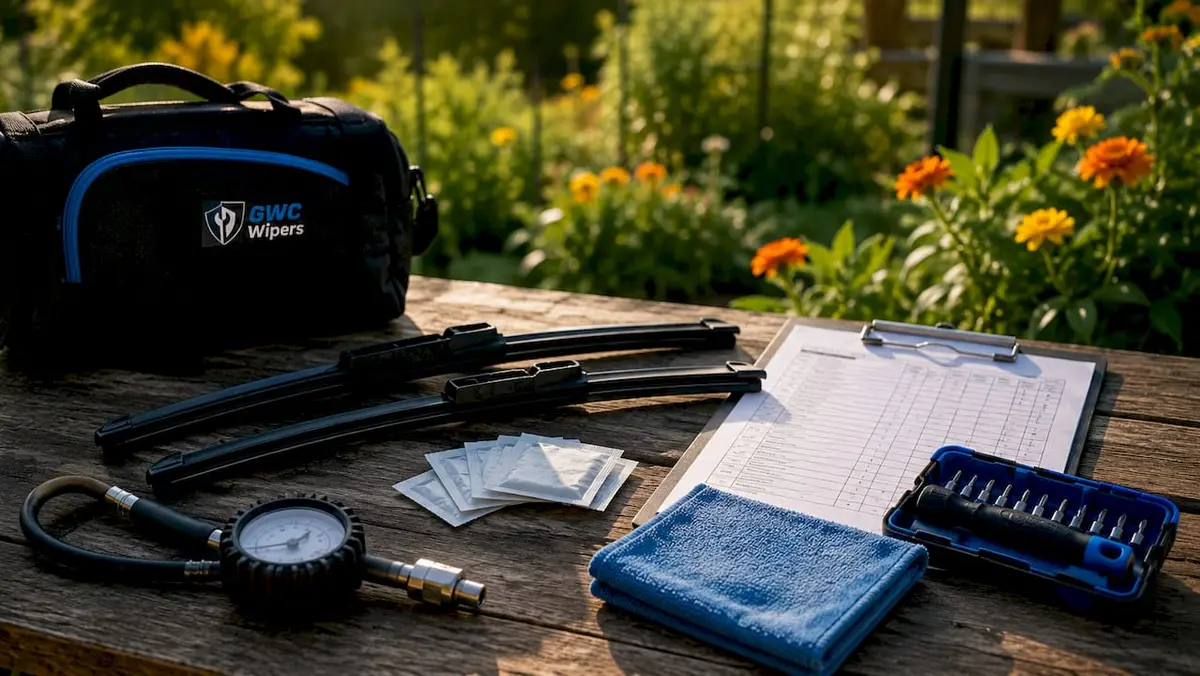
The right preparation makes a Honda wiper check faster, safer, and more thorough. Gathering your tools before you start means you won’t need to stop mid-inspection or risk damaging components by improvising.
Tools to have ready:
- Microfiber cloth (for cleaning blades and glass without scratching)
- Isopropyl alcohol wipes (for removing grime and rubber residue)
- A small inspection torch or LED work light
- A flat-head screwdriver (for releasing blade adapters on some Honda models)
- Clean water in a spray bottle (for live wipe testing)
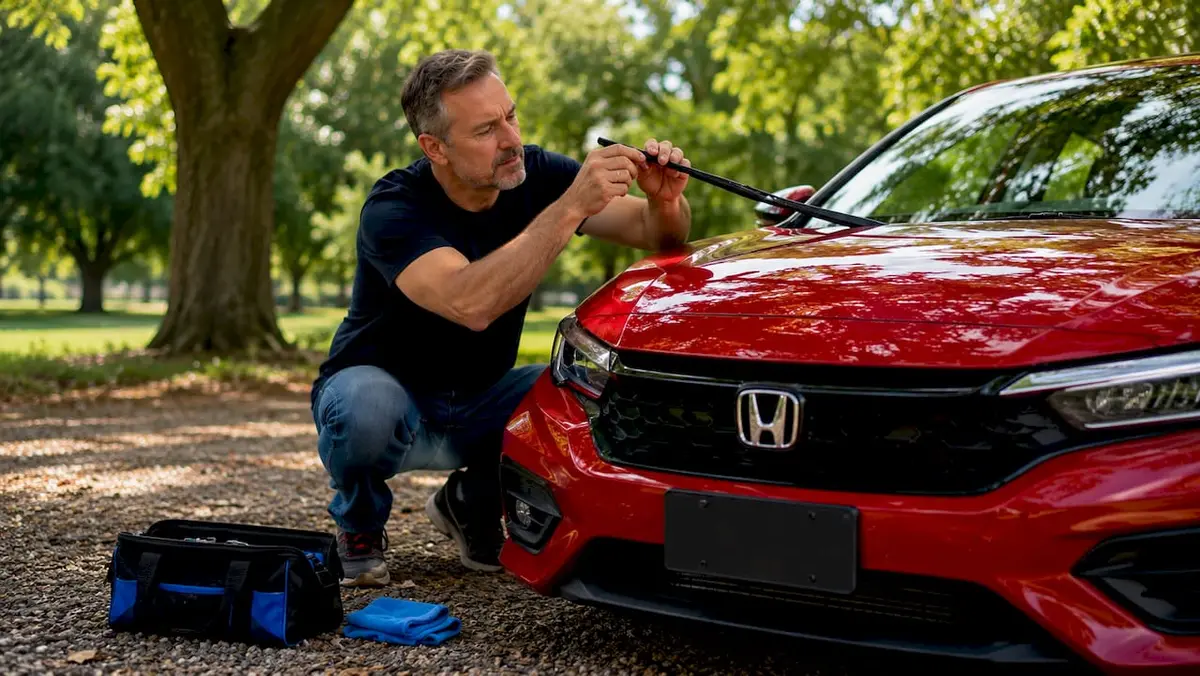
Once your tools are ready, the most critical preparation step is engaging the maintenance position on newer Honda models. Honda’s 2026 Owner’s Manual explains the process clearly: switch the power mode off, then hold the wiper switch in the MIST position for more than 2 seconds within 10 seconds. This raises the wiper arms to a safe, upright position for inspection. Skipping this step on models where wipers park below the bonnet line is a costly mistake.
Honda’s design parks wipers below the bonnet line for aerodynamic performance. Manually forcing the arms upward without engaging maintenance position risks cracked paint and broken linkage. Always follow the model-specific procedure before touching the arms.
Pro Tip: If you drive a Honda Jazz, the wiper switch behaviour for engaging maintenance position may differ slightly from other Honda models. Check your specific owner’s manual before proceeding, as the step by step Honda Jazz wiper switch sequence can vary by year.
For older Honda models without the maintenance position feature, turn the ignition fully off and allow the wipers to park in their resting position before lifting them by hand. Never lift wiper arms while the ignition is on or the motor is active.
How to perform a step by step wiper system inspection on your Honda
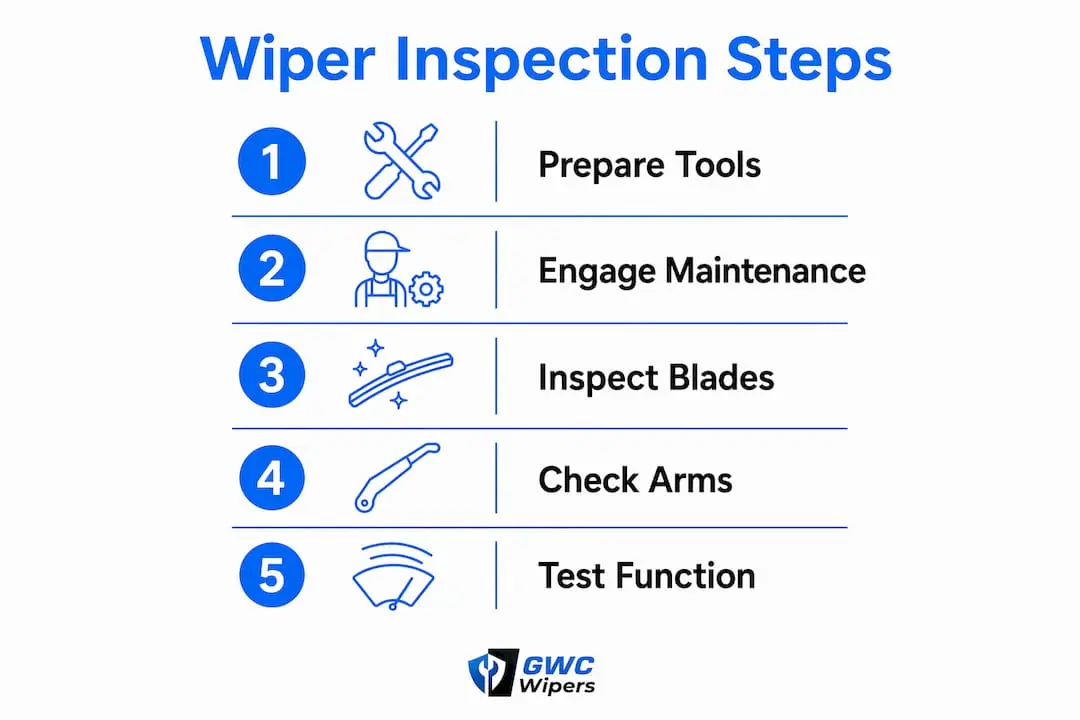
A thorough wiper blade inspection process covers the rubber blade, the wiper arm, the mechanical linkage, and the motor. Missing any one of these components leaves you with an incomplete picture of your system’s health.
-
Engage maintenance position. Follow the procedure above to raise the wiper arms safely. Never skip this on newer Honda models.
-
Inspect the rubber blade edge. Look closely along the full length of each blade. Honda’s technical documentation states you should replace blades immediately if you see streaks, noise during operation, or cracked and stiff rubber edges. In Australian conditions, UV exposure and heat cause rubber to harden and split well before the blade looks visibly worn.
-
Check for chips, splits, and uneven wear. Run your finger gently along the rubber lip. Any notch or flat spot will leave a streak line on the glass. Spray water on the windscreen and run the wipers briefly to confirm even contact across the full sweep arc. Uneven contact means the blade is no longer flat against the glass.
-
Inspect the wiper arm. Check that the arm sits flush against the blade connector and does not wobble. A loose arm nut is a common cause of poor wipe coverage. Tighten the nut at the arm base if there is any play.
-
Examine the mechanical linkage. Honda technical guidance confirms that a complete wiper system inspection must include the mechanical linkages. Look for loose bolts, cracked joints, or any sign of corrosion at the pivot points. A worn linkage causes the wiper to judder or lose its sweep arc mid-stroke.
-
Test motor function. Switch the wipers on through each speed setting. If the motor does not respond or operates intermittently, check the wiper fuse in the fuse box before assuming the motor has failed. A blown fuse is a quick and inexpensive fix.
-
Lower the arms safely. Once inspection is complete, return the wiper arms to their parked position before switching the ignition back on.
Pro Tip: Never run your wipers on a dry windscreen, even briefly during testing. Operating wipers on dry glass causes irreversible rubber damage and can scratch the windscreen. Always spray water first.
The wiper blade durability testing workflow above takes roughly 15 minutes per vehicle. Doing it every three months in Australia’s climate gives you a reliable baseline for when blades need replacing.
What are the common issues found during inspection and how do you fix them?
Most problems discovered during a step by step Honda wiper check fall into four categories. Knowing what each symptom means saves you time and money.
Common issues and their causes:
- Streaking or smearing. The rubber edge is worn, hardened, or contaminated with wax or road grime. Clean the blade with isopropyl alcohol first. If streaking continues after cleaning, the blade needs replacing.
- Chattering or skipping noise. The blade is not sitting flat against the glass. This is often caused by a bent wiper arm or a blade that has lost its curve from UV exposure.
- Poor sweep coverage. The arm spring tension has weakened, or the blade is the wrong size for your Honda model. Check that the blade length matches your vehicle’s specification.
- Intermittent or no operation. Check the wiper fuse first. If the fuse is intact, the issue may be the wiper motor or a broken linkage joint.
| Issue | Likely cause | Fix |
|---|---|---|
| Streaking | Worn or dirty rubber edge | Clean with alcohol; replace if streaking continues |
| Chattering | Bent arm or hardened blade | Adjust arm angle; replace blade |
| Poor coverage | Weak spring tension or wrong blade size | Check arm pressure; confirm correct blade size |
| No operation | Blown fuse or motor fault | Check fuse box; seek professional assessment if fuse is intact |
Calibration is the fix most Honda owners overlook. Wiper calibration involves small, incremental angle adjustments to align the wipe arc and blade pressure. Large, forceful adjustments risk damaging the arm and blade adapter. Make tiny corrections and test after each one.
Forcing wiper arms without engaging maintenance position is the single most common cause of linkage damage during DIY inspection. The repair cost far exceeds the time saved by skipping the procedure.
How to clean and maintain Honda wipers for longer blade life
Honda wiper maintenance between inspections is straightforward and takes less than ten minutes. The payoff is significantly longer blade life and better performance through Australian summers and winters alike.
Cleaning routine:
- Wipe each blade with an isopropyl alcohol wipe from root to tip. Cleaning blades with isopropyl alcohol removes road grime, wax residue, and rubber oxidation that cause streaking.
- Clean the windscreen glass with the same alcohol wipe before testing. A contaminated screen causes streaking even on a new blade.
- Dry both the blade and glass with a clean microfiber cloth before running the wipers.
Seasonal care specific to Australian conditions:
- In summer, engage the maintenance position when parking in direct sun for extended periods. Leaving blades pressed against a hot windscreen accelerates rubber hardening from UV exposure. The maintenance position prevents premature rubber degradation and reduces motor stress caused by blades sticking to the glass.
- In winter, use the maintenance position to prevent blades freezing to the windscreen overnight. Never pull frozen blades free by force. Use the defogger to warm the glass first, then lower the arms gently.
- Inspect and clean blades every three months as a minimum. Replace blades every 12 months in most Australian conditions, or sooner if you notice any of the deterioration signs covered in the inspection steps above.
Pro Tip: For Honda CR-V and HR-V owners, check the Honda HR-V wiper blade fitment guide before purchasing replacements. Blade sizes vary between model years, and the wrong size will not seat correctly on the arm.
A consistent maintenance habit is the most cost-effective wiper blade durability testing workflow available. Blades that are cleaned and stored correctly last noticeably longer than those left pressed against hot glass between uses.
Key takeaways
A thorough Honda wiper inspection covers the rubber blade, wiper arm, mechanical linkage, and motor, and must begin with the maintenance position on newer models to avoid damage.
| Point | Details |
|---|---|
| Use maintenance position first | Engage it before lifting wiper arms to prevent paint and linkage damage on newer Honda models. |
| Inspect blade, arm, and linkage | Check all three components, not just the rubber blade, to catch the full range of faults. |
| Never wipe on dry glass | Always spray water before testing to avoid irreversible rubber damage and windscreen scratches. |
| Clean with isopropyl alcohol | Regular alcohol cleaning removes grime and extends blade life between replacements. |
| Replace every 12 months | Australian UV and heat degrade rubber faster than milder climates; annual replacement is the reliable minimum. |
Why I think most Honda owners are inspecting their wipers wrong
Most drivers check their wipers by switching them on in the rain and deciding they’re fine if the glass clears. That’s not an inspection. That’s a gamble.
What I’ve seen repeatedly is that the mechanical side of the wiper system gets completely ignored. Drivers replace the rubber blade and assume the job is done, but a worn linkage joint or a weak arm spring will destroy a new blade within weeks. Honda’s own technical guidance is explicit: a proper inspection includes the linkages and motor verification, not just the blade. Most people never read that far into the manual.
The maintenance position feature is the other thing that surprises people. I’ve spoken to Honda owners who have been manually forcing their wiper arms up for years, not realising they were risking cracked paint and broken linkage every single time. The maintenance position for winter care alone is worth knowing about, but it applies equally to summer parking in Australia’s heat.
The honest truth is that a 15-minute inspection every three months costs nothing and prevents failures that can cost hundreds in repairs or, worse, leave you driving blind in a downpour on the Pacific Highway. Regular inspection is not optional maintenance. It’s the baseline.
— Faisal
Premium Honda wiper blades, ready to order across Australia
When your inspection reveals blades that need replacing, getting the right fit for your Honda model matters as much as the blade quality itself.
GWC Wipers stocks a full range of Honda wiper blades with a perfect fit guarantee across all popular models, including the Civic, CR-V, HR-V, Odyssey, and ZR-V. Every blade is built for Australian conditions, with UV-resistant rubber and aerodynamic designs that handle everything from coastal humidity to outback heat. Orders ship free across Australia, and every purchase is backed by a 12-month warranty and a 30-day money-back guarantee. Use the vehicle selector tool on the GWC Wipers website to confirm the correct blade size for your exact model and year before ordering.
FAQ
How do I engage maintenance position on a Honda?
Switch the power mode off, then hold the wiper switch in the MIST position for more than 2 seconds within 10 seconds. The wiper arms will raise to a safe inspection position.
How often should I inspect Honda wiper blades?
Inspect your blades every three months and replace them at least once a year. Australian UV exposure and heat degrade rubber faster than in cooler climates, so replace sooner if you notice streaking or noise.
What are the signs that Honda wiper blades need replacing?
Replace blades immediately if you see streaking, hear chattering or squeaking, notice cracked or stiff rubber edges, or observe uneven sweep coverage across the windscreen.
Can I lift Honda wiper arms without engaging maintenance position?
On older Honda models without the feature, yes. On newer models, always engage maintenance position first. Forcing the arms up manually risks cracked paint and broken linkage.
What should I do if my Honda wipers stop working?
Check the wiper fuse in the fuse box first. If the fuse is intact and the wipers still don’t operate, the fault may be the motor or a broken linkage joint, which requires professional assessment.