
Honda wiper arm alignment: a guide for Australian drivers

TL;DR:
- Properly aligning a Honda wiper arm involves removing the nut, homing the motor, and re-seating the arm at the correct angle for reliable operation. If splines are stripped or the pivot is seized, professional repair is necessary instead of DIY adjustment. Using the correct tools, marking the original position, and testing full sweeps ensure optimal wiper performance.
Realign a Honda wiper arm by removing the retaining nut, lifting the arm clear of the splined post, homing the wiper motor, re-seating the arm at the correct park angle, then tightening the nut securely. That sequence covers most misalignment issues on Honda Civic, Accord, CR-V and Insight models. Before you start, turn the ignition off and remove the keys.
Quick sequence at a glance:
- Turn ignition off and remove keys before touching any wiper components.
- Remove the plastic nut cap, then loosen and remove the retaining nut with the correct socket.
- Lift the arm straight off the splined post. Do not bend it into position — bending instead of reseating risks damaging the arm spring and geometry.
- With arms off, run the wipers briefly so the motor completes its full park cycle.
- Re-seat the arm at the intended resting angle, hand-tighten the nut, then torque to specification.
- Fit a premium blade and run several test cycles to confirm full sweep with no contact against the A-pillar or bonnet.
Pro Tip: Never power the wipers while an arm is tensioned against the glass without a blade fitted. The bare metal arm can scratch the windscreen and place sudden load on the motor.
Table of Contents
- What tools and prep do you need before starting the Honda wiper arm alignment process?
- Step-by-step: how to realign a Honda wiper arm safely
- How do you check the pivot and keep it moving freely?
- What causes Honda wiper misalignment, and when should you stop DIY?
- How do you verify sweep and choose the right replacement blades for Australia?
- How long does the job take, and what does it cost in Australia?
- Key takeaways
- Why alignment matters more than most drivers realise
- GWC Wipers: premium blades matched to your Honda
- FAQ
What tools and prep do you need before starting the Honda wiper arm alignment process?
Getting the preparation right saves you from stripping a nut or scratching the glass. Gather everything before you lift the bonnet.
Tools you will need:
- Socket or spanner set sized to your Honda’s retaining nut (typically 10 mm or 12 mm depending on model year); check exact fit with the Parts Finder - AAA Frictions to ensure correct hardware selection.
- Flat-head screwdriver or plastic trim tool to pop the protective nut cap.
- Torque wrench or hand wrench for final tightening.
- Protective tape or a soft foam tube to wrap the arm near the windscreen.
- Clean cloths and gloves to keep the splines free of grease and grit.
Prep steps:
- Use the GWC Wipers vehicle selector to confirm the correct blade size and arm compatibility for your specific Honda model and year before ordering anything.
- Park on level ground with the ignition off and keys removed.
- Remove the protective nut cap before attempting to loosen the retaining nut — trying to turn the nut with the cap still on can crack the cap or round the nut.
Pro Tip: Wrap a strip of masking tape around the wiper arm near the base before you start. Use a fine marker to note the arm’s current resting position on the tape — this gives you a clear reference point when re-seating.
Step-by-step: how to realign a Honda wiper arm safely
Standard DIY sequences cover removal, motor homing, re-seating and re-tightening. Follow each step in order — skipping the motor-homing step is the single most common reason arms end up misaligned again after the first use.
-
Confirm the park position and mark a reference. Note where each arm currently rests on the windscreen or cowl. A light pencil mark or tape reference helps you judge the correct angle when reinstalling.
-
Remove the cap and retaining nut. Pop the plastic nut cap with a trim tool. Use the correct socket to loosen and remove the retaining nut fully. Do not attempt to force the arm into a new position while the nut is still tight — that is how splines get stripped.
-
Lift the arm off the splined post. Pull the arm straight upward off the tapered spline. If it is seized, apply penetrating lubricant and allow time to soak before trying again. Use a proper arm-puller tool if needed; do not hammer the arm off. A seized pivot often signals corrosion or a failed bushing — if it will not budge with a puller, seek professional help rather than forcing it.
-
Home the wiper motor. With both arms removed, start the car briefly and run the wipers for one to two minutes. This allows the motor to complete its full park cycle and return to the true home position. Skipping this step means the arms will be out of position the moment you run them for the first time after reinstalling.
-
Re-seat the arm at the correct resting angle. Line the arm up with your reference mark and the manufacturer’s intended park position, then lower it firmly onto the splines. The Honda Accord service manual specifies the driver-side arm should rest near the top of the cowl cover; the Honda Civic 4-door specifies a higher resting position on the same panel. Use these figures as a cross-check if your model matches.
-
Hand-tighten, then torque the nut. Fit the nut and hand-tighten first to confirm the arm is seated correctly. Then torque to the manufacturer’s specification. Overtightening can strip threads or damage the wiper transmission — a common and costly mistake. Reinstall the protective cap.
-
Fit blades and run a full test. Attach your blades, then run several cycles at both low and high speed. Check for full sweep coverage, no contact with the A-pillar or bonnet edge, and no chatter or blade lift.
Pro Tip: Apply a small amount of manufacturer-recommended multipurpose grease to the splined post before re-seating the arm. Honda’s own 2019 Insight service manual specifies applying multipurpose grease to moving parts during wiper motor installation — the same principle applies here.
How do you check the pivot and keep it moving freely?
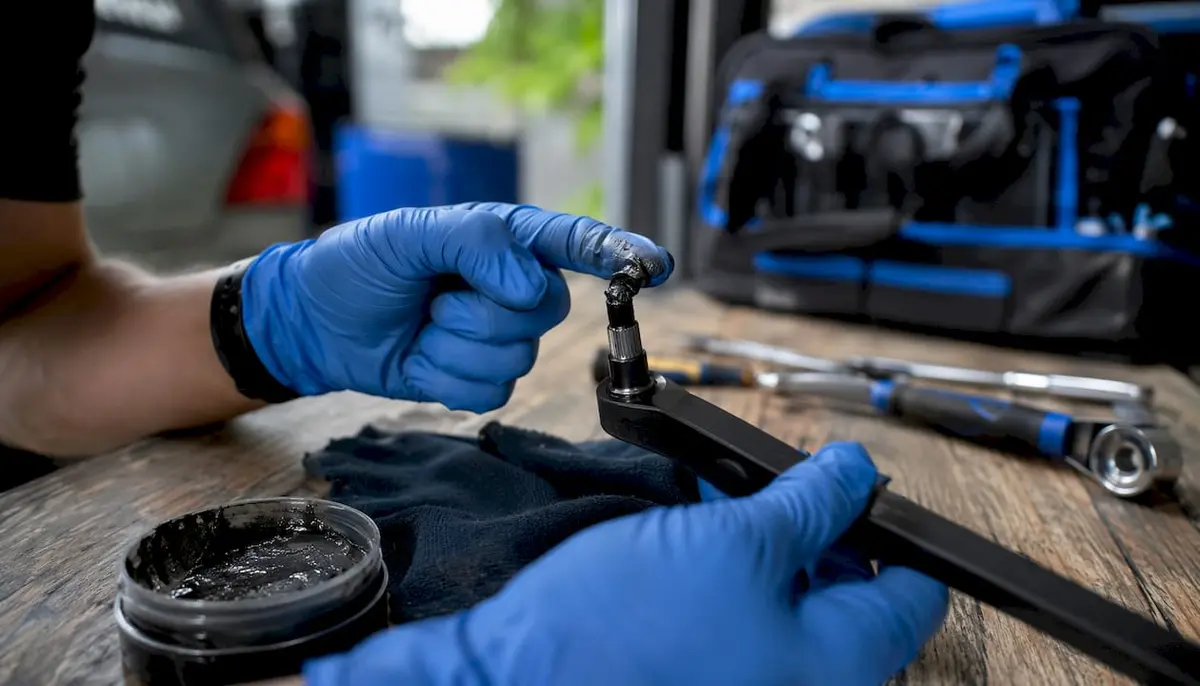
The pivot post is exposed to road grime, moisture and temperature swings year-round. Degraded lubricant causes binding that increases motor load and accelerates wear — technicians rate smooth pivot movement as equally important as arm alignment itself.
What to inspect and address:
- With the arm removed, rotate the splined post by hand. It should turn smoothly with light resistance. Any roughness, grinding, or stiffness suggests seized bearings, degraded grease, or corrosion.
- Inspect the pivot base for rust, accumulated grit, or cracked seals. Australian coastal and high-humidity environments accelerate corrosion on exposed metal pivot housings.
- Apply a light, appropriate lubricant sparingly to the splines and pivot shaft. Use manufacturer-recommended grease where specified. Over-lubrication attracts dirt and can migrate into the joint, making the problem worse over time.
- Check the pivot for binding after lubrication by rotating the post again before reinstalling the arm.
What causes Honda wiper misalignment, and when should you stop DIY?
Most misalignment on Hondas comes down to a handful of repeatable causes. Knowing which one you are dealing with tells you whether a simple re-seat will fix it or whether the car needs a workshop.
Common causes:
- Arm slipping on the splines after ice or debris load, or after the wipers were activated while frozen to the windscreen — a risk in alpine and southern Australian winters.
- Previous improper installation where the arm was bent rather than re-seated on the splines.
- Worn linkage bushings that allow the arm to drift even after a correct re-seat.
- A weak or broken arm spring that fails to hold the blade against the glass.
Red flags — stop DIY and see a mechanic:
- Splines are visibly stripped or rounded and the arm will not grip the post.
- The motor will not return to its home position or makes grinding noises.
- Excessive play in the wiper linkage that persists after re-seating.
- The arm slips back out of position after a correct re-seat and re-torque — this points to worn linkage or damaged motor linkage that needs professional inspection.
Never force the arm or overtighten the nut to compensate for a poor fit. Doing so risks stripping threads or damaging the transmission, turning a simple adjustment into a significantly more expensive repair.
How do you verify sweep and choose the right replacement blades for Australia?
After alignment, a proper sweep test confirms the job is done. This is also the right moment to fit premium replacement blades suited to Australian conditions.
Testing after alignment:
- Run multiple wiper cycles at both low and high speed with washer fluid active.
- Check that the blade covers the full intended sweep arc with no dead zones, streaking, or chatter.
- Confirm the blade does not contact the A-pillar, bonnet edge, or the opposite arm at any point in the cycle.
- Inspect the blade angle against the glass. Blades work best when perpendicular to the windscreen; a twisted arm causes chatter and uneven wear.
Blade selection for Australian conditions:
- Choose blades with corrosion-resistant fittings — salt air, humidity and UV exposure degrade standard fittings quickly in many Australian regions.
- Natural rubber compounds with UV stabilisation hold up better through summer heat than cheaper alternatives.
- Use GWC Wipers’ vehicle selector for a model-specific fit on your Honda. Blades built for Honda wiper performance in Australian climates come with preassembled adapters that seat correctly without modification.
Pro Tip: Always test with the premium blade you intend to keep, not an old worn one. A degraded blade masks alignment problems — you may think the sweep is fine when the blade is simply too soft to reveal the arm’s true arc.
How long does the job take, and what does it cost in Australia?
| Scenario | Typical time | Typical cost |
|---|---|---|
| Simple re-seat, no seized parts | 20–40 minutes | Minimal — nut/cap and lubricant only |
| Re-seat with pivot cleaning and lubrication | under an hour | Light lubricant and cleaning supplies |
| Bent or damaged arm requiring replacement | under an hour plus parts | Replacement arm cost varies by Honda model |
| Workshop: stripped splines or seized pivot | Diagnostic + repair time | Labour, diagnostic fee, and parts |
| Workshop: motor or linkage repair | Half-day or more | Parts and specialist labour |
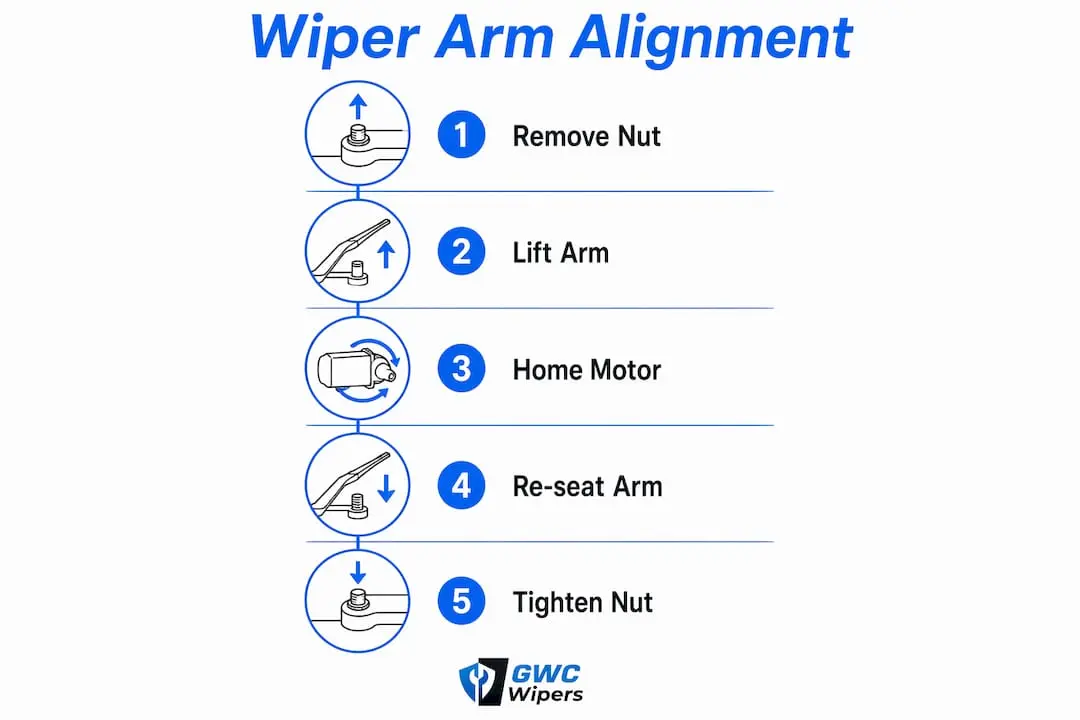
A straightforward re-seat with no seized components typically takes under an hour for one person. Allow extra time if you are cleaning the pivot or waiting for penetrating lubricant to work. Workshop costs rise considerably once the motor or linkage is involved, which is why catching the problem early and addressing it correctly the first time matters.
Key takeaways
Correct Honda wiper arm alignment requires removing the retaining nut, homing the motor with arms off, re-seating on the splines at the right angle, and torquing safely — never bending the arm or overtightening.
| Point | Details |
|---|---|
| Re-seat, never bend | Always remove the nut and re-seat the arm on the splines; bending damages the spring and arm geometry. |
| Home the motor first | Run the wipers 1–2 minutes with arms off so the motor returns to its true park position before reinstalling. |
| Torque carefully | Overtightening strips splines or damages the transmission; hand-tighten first, then torque to specification. |
| Know when to stop | Stripped splines, a seized pivot, or repeated slippage after a correct re-seat all require a workshop. |
| GWC Wipers fitment | Use GWC Wipers’ vehicle selector to confirm model-specific blade fit before purchasing replacement blades. |
Why alignment matters more than most drivers realise
Getting the arm angle right is not just about tidiness. A blade that parks even a few millimetres out of position can clip the bonnet seal, collide with the opposite arm, or leave a wide unswept band directly in the driver’s sightline during heavy rain. In Australian conditions, where summer storms arrive fast and visibility can drop in seconds, that matters.
What I see drivers underestimate is the motor-homing step. Most guides mention it; most DIYers skip it because it feels unnecessary. The result is arms that look correctly positioned when stationary but drift out of sync the moment the wipers run. The motor’s park cycle is the reference point the whole system relies on. Without it, you are guessing at the angle.
There is also a tendency to overtighten the retaining nut as a substitute for proper re-seating. If the arm keeps slipping, the instinct is to crank the nut harder. That strips the splines and turns a twenty-minute job into a workshop visit. The correct answer is always to check whether the arm is properly seated on the taper before applying any torque.
Pair a correctly aligned arm with a premium, vehicle-specific blade and the difference in wet-weather performance is immediate. GWC Wipers’ fitment guarantee and 12-month warranty mean you are not guessing on compatibility — the blade is matched to your Honda before it ships.
GWC Wipers: premium blades matched to your Honda
Once your arm is correctly aligned, the blade you fit determines how well the system actually performs. GWC Wipers designs and manufactures premium wiper blades specifically for Australian weather, with natural rubber compounds that resist UV degradation, corrosion-resistant fittings for coastal and high-humidity conditions, and preassembled adapters for a clean, direct fit on Honda models.
The vehicle selector covers over 2,500 models, so you get the exact blade length and connector for your Honda without guesswork. Every order ships free across Australia and is backed by a 30-day money-back guarantee and a 12-month warranty. If your alignment check revealed stripped splines, a seized pivot, or motor issues, the right move is a workshop first — then fit fresh blades once the arm is confirmed correct. Use the GWC Wipers vehicle selector to find your Honda’s match and order with confidence.
FAQ
How do you align a Honda wiper arm at home?
Remove the retaining nut, lift the arm off the splined post, run the wipers briefly with arms off to home the motor, then re-seat the arm at the correct park angle and torque the nut to specification. Always test with a full sweep cycle before driving.
Why do Honda wiper arms keep slipping out of position?
Repeated slippage after a correct re-seat usually points to worn linkage bushings or a damaged motor linkage rather than a simple alignment error, and requires professional inspection.
Can you bend a Honda wiper arm to fix the park position?
No. Bending the arm instead of re-seating it on the splines risks damaging the arm spring and geometry, and does not address the underlying misalignment on the splined post.
How long does a Honda wiper arm re-seat take?
A straightforward re-seat with no seized parts typically takes 20–40 minutes for one person with the correct tools.
When should you replace rather than realign a Honda wiper arm?
Replace the arm if the splines are stripped or rounded, the spring tension is weak or broken, or the arm is visibly bent and cannot hold the blade flat against the windscreen.